Feel Tasty
KFC AIR FRYER CHICKEN LEGS
AmandaJuly 26, 2026
Share on Facebook
Share on X (Twitter)
Share on Pinterest
Share on LinkedIn
Share on Email
Introduction
Craving that iconic, finger-lickin’ good flavor of KFC fried chicken but want a healthier, homemade alternative? You’ve come to the right place! Our KFC Air Fryer Chicken Legs recipe delivers all the crispy skin and juicy meat you love, without the mess and excessive oil of traditional deep-frying. Imagine biting into perfectly seasoned chicken drumsticks, golden brown and crackling on the outside, moist and tender on the inside – all achieved with the magic of your air fryer.
This recipe isn’t just about recreating a fast-food favorite; it’s about elevating your home cooking with a method that’s both convenient and mindful of your health. We’ve cracked the code to that signature KFC-style taste, combining a secret blend of herbs and spices with a clever double-dredging technique that ensures maximum crispiness. Forget greasy fingers and heavy feelings; prepare for a culinary experience that’s lighter, fresher, and just as satisfying.
Get ready to transform simple chicken legs into a family-friendly feast that will have everyone reaching for more. From the initial buttermilk soak that tenderizes the meat to the final golden crisp in the air fryer, we’ll guide you through every step to achieve perfection. So, ditch the drive-thru and embrace the delicious possibilities of homemade “fried” chicken, made healthier and easier than ever before!
Nutritional Information
Per serving (approximate values):
Calories: 350
Protein: 35g
Carbohydrates: 25g
Fat: 12g
Fiber: 1g
Sodium: 600mg
Ingredients
8 large chicken drumsticks (about 2.5-3 lbs total)
2 cups buttermilk (or 1.5 cups milk + 2 tbsp white vinegar/lemon juice, let sit 5 mins)
2 cups all-purpose flour
1/2 cup cornstarch
2 tbsp paprika
1 tbsp garlic powder
1 tbsp onion powder
1 tbsp dried oregano
1 tbsp dried basil
1 tbsp dried thyme
1 tsp cayenne pepper (adjust to taste for heat)
1 tsp black pepper
2 tsp salt, divided (1 tsp for brining, 1 tsp for flour mixture)
Cooking spray or 1-2 tbsp olive oil/avocado oil
Instructions
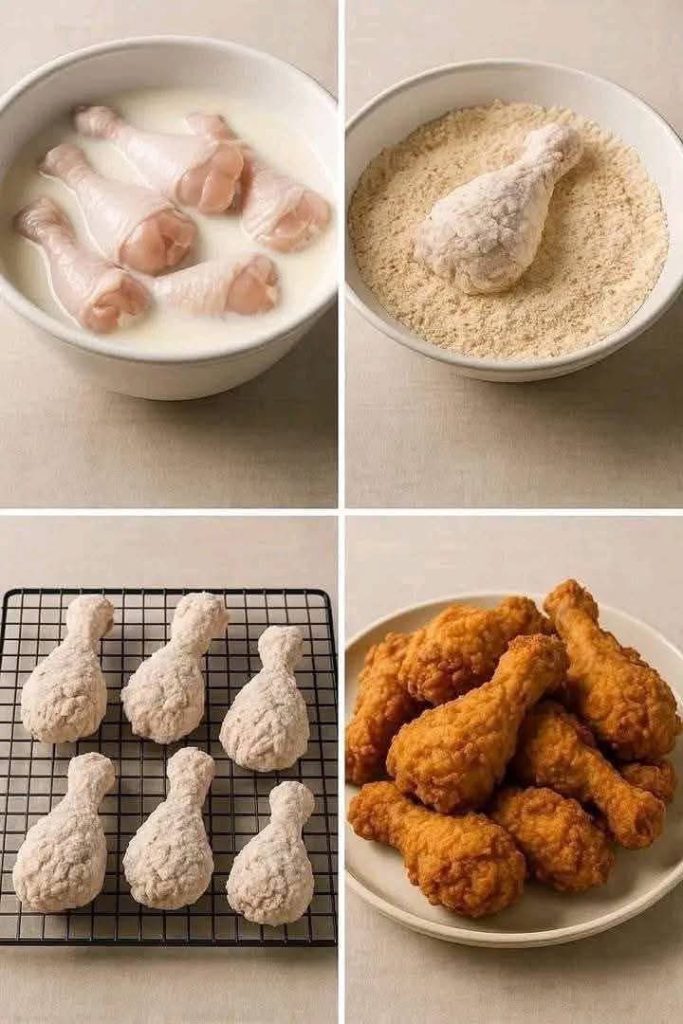
Prepare the Chicken Soak: In a large bowl or resealable bag, combine the buttermilk and 1 teaspoon of salt. Add the chicken drumsticks, ensuring they are fully submerged. Cover and refrigerate for at least 2 hours, or preferably overnight, to tenderize the chicken and infuse flavor.
Set Up Dredging Stations: In a shallow dish or pie plate, whisk together the all-purpose flour, cornstarch, paprika, garlic powder, onion powder, oregano, basil, thyme, cayenne pepper, black pepper, and the remaining 1 teaspoon of salt. This will be your dry dredge.
Preheat Air Fryer: Preheat your air fryer to 375°F (190°C) for at least 5 minutes. This ensures even cooking and helps achieve crispiness from the start.
Breading the Chicken: Remove one chicken drumstick from the buttermilk soak, allowing excess liquid to drip off. Immediately transfer it to the dry dredge, pressing firmly to ensure the entire surface is coated.
Double Dredge for Extra Crispiness: Dip the flour-coated drumstick back into the buttermilk mixture for a quick second, letting excess drip off. Then, return it to the dry dredge, pressing firmly again to create a thick, craggy coating. Place the breaded drumstick on a wire rack set over a baking sheet. Repeat this process for all remaining chicken drumsticks.
Rest the Breading: Let the breaded chicken drumsticks rest on the wire rack for 10-15 minutes. This crucial step allows the coating to adhere better, preventing it from flaking off during cooking and contributing to a crispier crust.
Air Frying – First Batch: Lightly spray the air fryer basket with cooking spray or brush with a little oil. Carefully place 2-4 breaded drumsticks in a single layer in the air fryer basket, ensuring they do not touch or overcrowd the basket. Lightly mist the tops of the chicken with cooking spray or brush with oil.
Cook First Side: Air fry for 15 minutes at 375°F (190°C).
Flip and Continue Cooking: After 15 minutes, carefully flip the drumsticks. Lightly mist the other side with cooking spray or brush with oil. Continue to air fry for another 10-15 minutes, or until the chicken is golden brown, crispy, and cooked through.
Check for Doneness: The internal temperature of the thickest part of the chicken should reach 165°F (74°C) when checked with an instant-read thermometer.
Rest and Serve: Once cooked, remove the chicken from the air fryer and place it on a clean wire rack for 5 minutes. This allows the juices to redistribute, resulting in more tender and flavorful chicken. Repeat steps 7-11 with any remaining chicken.
Cooking Tips and Variations
To truly master your Air Fryer KFC Chicken Legs, consider these expert tips and exciting variations:
Achieving Maximum Crispiness: Don’t skip the resting step after breading; it’s vital for a firm coating. Also, a light spray of oil on the chicken before and halfway through cooking helps with browning and crispiness. Always ensure your air fryer is preheated and avoid overcrowding the basket, as this steams the chicken instead of frying it, leading to a soggy result.
Buttermilk Substitutes: If you don’t have buttermilk, you can easily make your own by adding 1.5 tablespoons of white vinegar or lemon juice to 1.5 cups of regular milk. Let it sit for 5-10 minutes until it slightly curdles. For a dairy-free option, unsweetened almond milk with vinegar works well.
Seasoning Blend Customization: The spice blend is key to the “KFC” flavor. Feel free to adjust the cayenne pepper for more or less heat. For an extra kick, a pinch of smoked paprika or a dash of chili powder can be added. Some people like to add a tiny amount of ground ginger or celery salt for an even more complex flavor profile.
Preventing Sticking: Always preheat your air fryer and lightly grease the basket. If you find your chicken still tends to stick, you can line the bottom of the basket with air fryer parchment paper, ensuring it doesn’t block air circulation.
Batch Cooking: If you’re cooking for a crowd, you’ll likely need to cook in multiple batches. Keep cooked chicken warm in a low oven (around 200°F or 90°C) on a wire rack over a baking sheet while you finish the remaining batches.
Serving Suggestions: These chicken legs are fantastic with classic side dishes like mashed potatoes and gravy, coleslaw, corn on the cob, or a fresh green salad. For a lighter meal, serve with roasted vegetables or a quinoa salad.
Other Chicken Cuts: This recipe works beautifully with other bone-in, skin-on chicken pieces like thighs or wings. Adjust cooking times accordingly; thighs typically take a similar amount of time, while wings may cook faster. For boneless chicken breasts, reduce cooking time significantly to prevent drying out.
Storage and Reheating
Proper storage and reheating are essential to maintain the deliciousness of your Air Fryer KFC Chicken Legs:
Storage: Allow any leftover chicken to cool completely before storing. Place the chicken in an airtight container and refrigerate for up to 3-4 days. For longer storage, you can freeze the cooked chicken for up to 2-3 months. Wrap individual pieces tightly in plastic wrap or aluminum foil, then place them in a freezer-safe bag or container.
Reheating from Refrigerator: The best way to reheat air fryer chicken legs to retain their crispiness is, you guessed it, in the air fryer! Preheat your air fryer to 350°F (175°C). Place the chicken in a single layer in the basket and cook for 8-12 minutes, flipping halfway through, until heated through and crispy.
Reheating from Freezer: If reheating from frozen, you can place the chicken directly into the preheated air fryer at 350°F (175°C). It will take longer, usually around 20-30 minutes, flipping halfway, until heated through and crispy. Alternatively, you can thaw it in the refrigerator overnight before reheating as described above.
Oven Reheating: If you don’t have an air fryer, you can reheat the chicken in a conventional oven. Preheat to 375°F (190°C). Place chicken on a wire rack set over a baking sheet and bake for 15-20 minutes (from fridge) or 25-35 minutes (from frozen), until hot and crispy.
Microwave (Not Recommended for Crispiness): While you can reheat in the microwave, it will likely result in soggy chicken. Only use this method if crispiness is not a priority. Heat in 30-second intervals until warmed through.
Frequently Asked Questions
Do I need to use buttermilk for this recipe?
While buttermilk is highly recommended for its tenderizing properties and ability to help the breading adhere, you can substitute it. A mixture of regular milk and a tablespoon or two of white vinegar or lemon juice, allowed to sit for 5 minutes, will create a similar acidic environment that works effectively.
Can I make this recipe with boneless chicken breasts or thighs?
Absolutely! This recipe works well with other cuts of chicken. For boneless, skinless chicken breasts or thighs, you’ll need to significantly reduce the cooking time, typically to 12-18 minutes total, depending on thickness, to prevent them from drying out. Bone-in, skin-on thighs will cook similarly to drumsticks, perhaps a few minutes longer.
My chicken isn’t getting crispy enough in the air fryer. What am I doing wrong?
Several factors can affect crispiness. Ensure you’re not overcrowding the air fryer basket; cook in batches if necessary. Preheat your air fryer properly, and don’t skip the light spray of oil on the breaded chicken before and during cooking. Also, allowing the breaded chicken to rest for 10-15 minutes on a wire rack before air frying helps the coating adhere and crisp up better.
How do I ensure the chicken is cooked through and safe to eat?
The only way to guarantee chicken is safely cooked is by checking its internal temperature with an instant-read meat thermometer. Insert the thermometer into the thickest part of the chicken, avoiding the bone. The chicken is safely cooked when it reaches an internal temperature of 165°F (74°C).